AWS S3 Read Write IAM Policy to allow Read-Write Operations on a Specific S3 Bucket

Frequently you may need to set up a IAM Role or Policy that allows access only to a specific AWS S3 Bucket and the objects within it.   You can use this policy to accomplish this.

{
“Version”:”2012-10-17″,
“Statement”:[
{
“Effect”:”Allow”,
“Action”:[
“s3:ListBucket”,
“s3:ListBucketByTags”,
“s3:ListBucketVersions”,
“s3:GetBucketLocation”,
“s3:GetBucketTagging”,
“s3:ListBucketMultipartUploads”
],
“Resource”:[
“arn:aws:s3:::<BUCKET-NAME>”
]
},
{
“Effect”:”Allow”,
“Action”:[
“s3:PutObject”,
“s3:GetObject”,
“s3:GetObjectTagging”,
“s3:DeleteObject”,
“s3:DeleteObjectTagging”,
“s3:AbortMultipartUpload”,
“s3:ListMultipartUploadParts”
],
“Resource”:[
“arn:aws:s3:::<BUCKET-NAME>/*”
]
}
]
}

InSpec a tool to create compliance as code

Inspec  (link) is an open source testing framework for infrastructure with a human readable language for specifying compliance, security and other policy requirements.

In short, it is a self-documenting testing & audit framework where infrastructure and security compliance requirements can be expressed as code.  (Compliance as code)

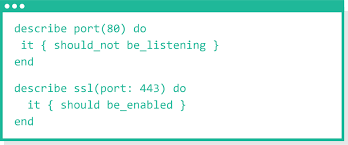
InSpec sample code snippet

What Problem is it trying to solve?

Inspec solves multiple problems:

  • As companies adopt continuous delivery & deployment methods; infrastructure and other environment dependencies are abstracted into infrastructure-as-code artifacts. These code artifacts are then checked into source control and used to produce immutable infrastructure.   Inspec can be used to test/audit the systems that the infrastructure-as-code produced to determine if it meets the intended requirements.   Inspec profile artifacts define the tests and policies that are used to validate the infrastructure which in turn can be version controlled and checked into source control.  The Inspec  profiles can then be called from CI/CD pipeline tools such as Jenkins to automate the running of the Inspec tests.


  • Another use case for Inspec is compliance testing.  Inspec can be used to codify security or compliance requirements into a series of controls/tests.  In this use case the Inspec profile becomes a compliance-as-code artifact that can be version controlled and checked into source control.  These compliance-as-code artifacts can also be used as a test pattern for use in CI/CD tools such as Jenkins thus adding compliance testing to a CI/CD pipeline.


What does it do?/ How does it do it?

Inspec developers create test profiles that are understandable, declarative, unambiguous and group them into a descriptive artifact that can contain additional meta data such as security control numbers.  These profiles are code-artifacts that can be version controlled and used repeatedly to test systems to determine if they meet the standard.

Inspec can be run locally on systems with the Inspec executable as well as on remote target systems via SSH or Windows winrm methods.  Target systems include virtual machines or docker containers.  Inspec also is extensible via resource packs.  Some example resources packs include cloud services such as AWS, Azure and private cloud infrastructure such as VMware as well as Chef/test-Kitchen.

Tools Integrations

CI/CD Pipeline tools: Jenkins, VSTS

Cloud Platforms: AWS , Azure services and resources can be tested/audited via Inspec resource packs for AWS and Azure.

Value Proposition/Benefits

Inspec brings automated testing, security policies and compliance control auditing together into single human readable expressive language.  The Inspec profile artifacts are self-documenting in that they can read by non-developers who can view the tests and criteria used to test the environment.

Similar Products

Serverspec – Serverspec is a similar tool which allows you to create Rspec tests which primarily validate infrastructure resources.  (services, ports, packages etc.)  Inspec started as a Serverspec extension and developed into its own standalone project.  Inspec adds compliance testing capabilities.

Testinfra – Testinfra is ServerSpec equivalent in python and is written as a plug-in to the powerful Pytest test engine.

AWS Lambda RDS Snapshot Copies – Long term backups

AWS’s managed database service is pretty awesome. Its a managed service that takes care of the heavy lifting for managing a database server letting you focus on running your application rather than managing a database server. The service provides patching, automated backups etc.

A nice feature of the AWS RDS service is automated backups. The service will create automated backups on the schedule you desire (daily, weekly etc.) and gives you up to 35 days of backup retention. But what if you need more than 35 days of database backups?

Do you create your own backups manually? Ah, nope. Manually means its not going to get done. Do you schedule native backups? Ah, while somewhat possible, its not very elegant. How about using Lambda? Yes! Serverless code. But how?

Using this python lambda script and the AWS python API’s you can copy the current latest RDS snapshot and maintain a weekly retention history that suits your needs. Likewise, you also might need to retain a long term history of monthly backups. We got you covered with that as well.

Here is a snippet of the documentation that describes the scripts functionality:

rds-copy-snapshots-lambda: Makes a copy of the most recent auto snapshot and deletes ones older than the set retention period.

There are two versions of the script: a weekly version and a monthly version. You can choose to use only weekly, monthly, or both of them as you see fit.

Weekly and Monthly Snapshots are named and tagged differently to allow for filtering by type as well as to prevent inadvertent deletion.

More details about the rds-copy-snapshots-lambda function can be found here: https://github.com/swmacdonald/rds-copy-snapshots-lambda

AWS S3 CP Command Line Example to Change Encryption keys

The AWS Console allows you to upload files to a bucket and set the server side encryption.  This defaults to AES256.  However, there are times when you may want to encrypt a S3 object using a specific key.  For example, RDS SQL database native restore.   Therefore at times you may need to change the key used to encrypt a S3 object.  In that case, this command line example may prove useful to others.

To change an existing AES256 encrypted object to another encryption key in KMS use the AWS S3 CP command:

aws s3 cp s3://mybucket/test.txt s3://mybucket/test2.txt --sse aws:kms --sse-kms-key-id <key arn>

Because the original file was encrypted with default server side encryption of AES 256 it will automatically assume AES256 and decrypt the file as part of the copy process to re-encrypt with the new key.


How to: Launch a AWS Linux Instance using Encrypted Boot Volumes

Using encrypted boot volumes for AWS Linux Instances is not very well documented.   Here is a how to for launching a AWS Linux instance using encrypted boot volumes.

Note that encryption has a performance impact on the instance, and thus it will require a larger instance size to run.  You will not be able to get a t2.micro instance to boot as it does not have enough CPU performance.

The process is broken down into 4 steps

  1. Create a Role for the EC2 instance to access encryption keys
  2. Create the Encryption key
  3. Create a custom AMI using your Encryption key
  4. Launch the Instance using your custom AMI.

All the instances launched from the custom AMI will use the same encryption key.  Create another custom AMI if you need different encryption keys.


Step 1: Create a IAM role which will be used by the EC2 instance.  (Used to access encryption keys to boot etc.)

  • Sign in to the IAM console at https://console.aws.amazon.com/iam/.
  • In the navigation pane of the IAM console, click Roles, and then click Create New Role.
  • For Role name, type a role name that can help you identify the purpose of this role. Role names must be unique within your AWS account. After you type the name, click Next Step at the bottom of the page.

Important

Role names must be unique within an account. They are not distinguished by case, for example, you cannot create roles named both “PRODROLE” and “prodrole”.

  • Expand the AWS Service Roles section, and then select the Amazon EC2 click Select.
  • Click Next Step to review the role. Then click Create Role.


Step 2: Create a EBS encryption key to be used to encrypt the target <instance_name> volumes.

  • Sign in to the AWS Management Console and open the Amazon RDS console at https://console.aws.amazon.com/iam/.
  • In the top right corner of the Amazon RDS console, choose the region in which you want to create the encryption key
  • In the navigation pane, choose Encryption Keys.
  • Click Create Key.
  • Enter a name for the encryption key in the Alias field.  Example: <instance_name>_ebs_key
  • Enter a description for the encryption key. Example: EBS encryption key for the <instance_name>
  • Click Next Step
  • Add tag meta data
  • Click Next Step
  •  In the Key Administrators field, select the users and or roles who will have administrative rights to administer the key.
  • Click Next Step
  • In the Define Key Usage Permissions – This Account  Select the <instance_name> role you created above
  • Click Next Step
  • Review the Key Policy and if acceptable, click Finish. 


Step 3: Create a custom AMI based on the current Amazon Linux AMI which contains encrypted volumes/snapshots.

This will allow for encrypted volumes on the target instance.

  • Locate the latest Amazon Linux AMI in your region by attempting to launch a new EC2 instance.
  • From EC2 Console, Click Launch Instance. The latest current Amazon Linux AMI will be listed at the top of the Quick Start List. Copy the ami-xxxxxxx number.
  • From the EC2 Console, Select AMIs from the left navigator.
  • Paste in the copied ami-xxxxxx into the search filter
  • Choose Actions > Copy AMI, select the Destination region and check the Encryption checkbox option
  • For Master Key choose the EBS encryption key you created above and assigned to the target instance role you created in step 1.
  • Click Copy AMI.
  • The AMI is being copied to your account using the encrypted volumes/snapshots.


Step 4: Launch a Linux Instance using the custom AMI with your Encrypted EBS Volumes

  • Sign in to the AWS Management Console and open the Amazon EC2 console at https://console.aws.amazon.com/ec2/.
  • In the top right corner of the Amazon EC2 console, choose the region in which you want to create the new EC2 instance.
  • In the navigation pane, choose Instances.
  • Click the Launch Instance
  • Choose the custom Linux AMI you created in Step 3
  • Choose the instance type and click Next: Configure Instance Details
  • NOTE: Encrypted EBS volumes requires a larger instance size due to the encryption/decryption overhead.  A m3.large or larger is recommended.
  • Set the Network, Subnet-Availability Zone, and Auto-assign Public IP options as required.
  • For IAM role, choose the Instance Role you created in step 1 above.
  • Set the Shutdown behavior to Stop, and check the Protect against accidental termination box to enable termination protection on the instance.
  • Click Next: Add Storage to proceed to the next step.
  • Review the default EBS volume configuration of 8 GB root volume using general purpose SSD.  Adjust the volume size if needed and click Next: Add Tags.
  • Click Next: Configure Security Group.
  • Assign an existing Security Group or create a new Security Group as needed. Click Review and Launch.
  • Review the instance settings and Click Launch to launch the instance.
  • On the Select an existing ssh key pair or create a new key pair screen, either create a new ssh key or assign an existing key pair. Click Launch Instances to launch the new instance.
  • Wait for the new instance to launch and connect to instance to verify.


How to install Pandora XBMC Addon for the Raspberry Pi

pandora_logo

I recently set out to find a Pandora XBMC Addon for my Raspberry Pi that I connected to my whole house audio system as one of its sources.

While I enjoy my own music library, its nice to discover new artists via Pandora.

So I set out to find a Pandora XBMC Addon.  For whatever reason finding the latest version of this addon can be a challenge.  Multiple developers have contributed to the project but the repos don’t seem to be linked or easy to find.

Hopefully this post will help other Raspberry Pi, XBMC, OpenOLEC, and Raspbmc users who wish to use Pandora find what they are looking for.  Without further ado, here are the details…

All credit goes to the add-on developers, all I’ve done is to write up this how to…

RobWeber’s Github repo for his Pandora XBMC Addon version 1.3.06 is located here: https://github.com/robweber/script.xbmc.pandorajson


How to install the Pandora XBMC addon:

Login to your raspberry pi via ssh and download the github zip file with this command

wget --no-check-certificate https://github.com/robweber/script.xbmc.pandorajson/archive/master.zip

The file will be downloaded to your pi user home directory.  Now rename the file with this command

mv master.zip script.xbmc.pandorajson1.3.06.zip

Go to the XBMC interface and install the plug using this procedure:

System > Settings > Addons > … >Install from zip file > Home Directory

Select the file script.xbmc.pandorajson1.3.06.zip

The addon should now install and in a few seconds you should see Pandora Json enabled.

Now configure your Pandora username settings by going to:

System > Settings > Add-ons > Music Add-ons > Pandora Json > Configure

Note: Be sure to use the on screen keyboard to enter your username and password.  I tried to use my attached usb keyboard to enter these but kept getting authentication errors until I used the onscreen keyboard to enter them.  Strange, but true.

Enjoy!


Useful Isilon Commands for Troubleshooting

Here are some some useful Isilon commands to assist you in troubleshooting Isilon storage array issues.


Grep the log for stalled drives on the isilon cluster

     cat /var/log/messages |grep -o 'stalled: [0-9,*:]*'|sort |uniq -c

(Stalled drives are bad, and can cause cluster problems. you could also run this command on the individual nodes /var/log/restripe.log )

Grep the log for stalled drives on the isilon cluster for month of Sept

grep 'Nov ' /var/log/messages |grep -o 'stalled: [0-9,*:]*'|sort |uniq -c

Use this on the restripe.log

  grep 'Nov ' /var/log/restripe.log |grep -o 'Stalled drives are \[[0-9,*:]*\]'|sort |uniq -c 

When reviewing the results of the stalled drives it is important to note that the drive numbers listed is the logical drive number and not the bay number.  You need to run the command “isi devices” on the node with the suspect drive to determine what bay the drive is actually in.

Display the SMART error log of all the drives on a given isilon node:

isi_radish -a|less

Display the current isilon Flexprotect Policy

isi get /ifs

Display the current isilon node hardware status:

isi_hw_status

Display the status of the isilon node network config

isi config

then while in the config utility

 status 

Display this list of alerts in wide format

 isi alerts -w

Start/Stop/Resume/Pause Restriper jobs

 isi restripe pause 
isi restripe start 
isi restripe stop 
 isi restripe resume -i

Display the drive status of a given isilon node

     #for node 3
     isi devices -d 3  

Display the SAS drives Physical Monitoring stats for errors

     less /var/log/isi_sasphymon.acc

Test Active Directory connections from all isilon nodes

     isi_for_array wbinfo -t

To find an open file on Isilon Windows share

     isi_for_array -q -s smbstatus | grep 
  then find the PID from the results and  then run this to get the user
     isi_for_array -q -s smbstatus -u| grep    to get the user

Note: The isi_for_array command runs the command on all of the nodes. This command will ask for the user’s password so that it can login to the other nodes and complete the command. When passing the results of a “isi_for_array” command to another command such as grep (like the example above) will require the user password so that it can be passed to the other nodes. There is no prompt for the password so you must enter it on the next line and press enter to get the results of the command.
 

How to Mass Export All Exchange 2010 Mailboxes to PST

I recently ran into a situation where I needed to mass export all the Exchange 2010 Mailboxes out to PST files.

Use this quick powershell code snippet to accomplish the task:

$mailboxes = get-mailbox
foreach ($mailbox in $mailboxes) {
new-mailboxexportrequest -mailbox $mailbox -FilePath \\server\c$\$mailbox.pst
}

Note that the file path must be a UNC path and not a drive letter!

To monitor the status of the exports use the following command:

Get-MailboxExportRequest | Get-MailboxExportRequestStatistics

Situations where you may need to use this:

  • Migrate mailboxes completely out of your exchange 2010 environment
  • Backup all mailboxes in their current state for legal discovery
  • Backup all mailboxes for import into a email archive application
  • Historical archive of mailbox out of exchange 2010 for legal or compliance purposes

You may need to add the “Mailbox Import Export” role to your administrator account.  If so use this command:

New-Managementroleassignment –Role “Mailbox Import Export” –User “Administrator”


Free Tool to Detect and Resolve VMware VM Partition Alignment Issues

I recently discovered a free tool that will assist VMware admins in detecting and resolving VMware VM partition alignment issues.  VM partition alignment is critical in reducing i/o at the storage array level for VMware infrastructure.  Essentially poorly aligned VM partitions can double or triple the i/o cycles to the storage array.  If VM admins ignore this problem or are unaware of the issue, this problem can snowball and consume excessive storage i/o limiting the number of VM’s that can be supported on a VM infrastructure.

The free tool is called UberAlignUberAlign will scan your VM infrastructure for misaligned VM’s and optionally re-align the VM to the correct offset.

More information about UberAlign can be found here.

More detailed information about VMware VM alignment issues can be found here.

Microsoft Word 2007/2010 Spell Check does not work – How to resolve this issue

I recently ran into an issue that took awhile to fix. A colleague’s office computer just would not spell check in Microsoft Word 2007 or Outlook. I tried several steps to repair the issue including un-installing and re-installing office. The final fix was to delete a registry key. If you run into this problem, here are few tips on what items to check.

  1. Check that to see if Spell Checking has been disabled.
    • In Microsoft Word 2007, click the Office Button, then click “Word Options” (For Microsoft Word 2010 Click the File Tab then “Options”)
    • On the left Click “Add-ins”
    • At the bottom of the menu next to “Manage” choose “Disabled Items” then click “Go”.
    • Verify that “Spell Check” is NOT in the list of disabled items. If it is, enable it and test to see if spell check works. Otherwise proceed to step #2.
  2. Check to see if the language is set correctly.
    • In Word, click the Review Tab
    • On the ribbon, click Language
    • In the Language Dialog, ensure your correct language is checked, verify that “Detect language automatically” is checked, and that “Do not check spelling or grammar” is UNCHECKED. Click OK
    • Test to see if spell check is working now. If not, proceed to step #3.
  3. With all your office applications closed, delete the following registry key (you may want to back up the key before deleting it just in case…) KEY_CURRENT_USER\Software\Microsoft\Office\12.0\Word Restarting Word will recreate the registry key. Check to see if spell check works for you. If not, proceed to step #4.
  4. With all your office applications closed, delete the following registry key (you may want to back up the key before deleting it just in case…) HKEY_CURRENT_USER\Software\Microsoft\Shared Tools\Proofing Tools\1.0 Restarting Word will recreate the registry key. Check to see if spell check works for you.

In my colleague’s case, step # 4 resolved the issue.


I hope this posting will assist someone in resolving a similar issue.